Friday, December 27, 2013

Mehndi Inspired Mirror Frame

Every time I visit India, I try to get mehndi applied on my hands and legs… I love the temporary staining in intricate and detailed patterns. I look forward to sitting down with the mehndi artist, the whole process of mehndi application is a celebration and a wonderful experience. The feeling is a combination of a sense of peace and excitement whether you get it applied alone or as part of a larger group. The scent of the mehndi itself is intoxicating; the distinct heavy earthy smell of the henna, the strong fragrance of eucalyptus oil… all remind me of home and family.

Stock Photo

This recent visit to India too I was able to get mehndi applied on my hands. Luckily these mehndi artists are now cropping up everywhere and you can find them almost in every market sitting on plastic stools usually occupying a bit of space in front of a busy store. They work fairly quickly and you can get work done beginning from the tip of your fingers all the way up to the elbows on both hands in about an hour or so. The quality of work usually lies in how thin of lines you can put down and how close the lines are. You want a very tight, neat, clear, and detailed look. The skin decoration usually done on the hands and feet using mehndi don’t last long as the staining penetrates only the top layer of the skin and lasts about 3 weeks or so.


This classical and elegant art form has been reinterpreted by artists and specifically the mehndi designs have been adapted to other art forms and across design styles bringing a new crisp modern, contemporary, or traditional look to this age old art. Here's my creative exploration of this fascinating art.


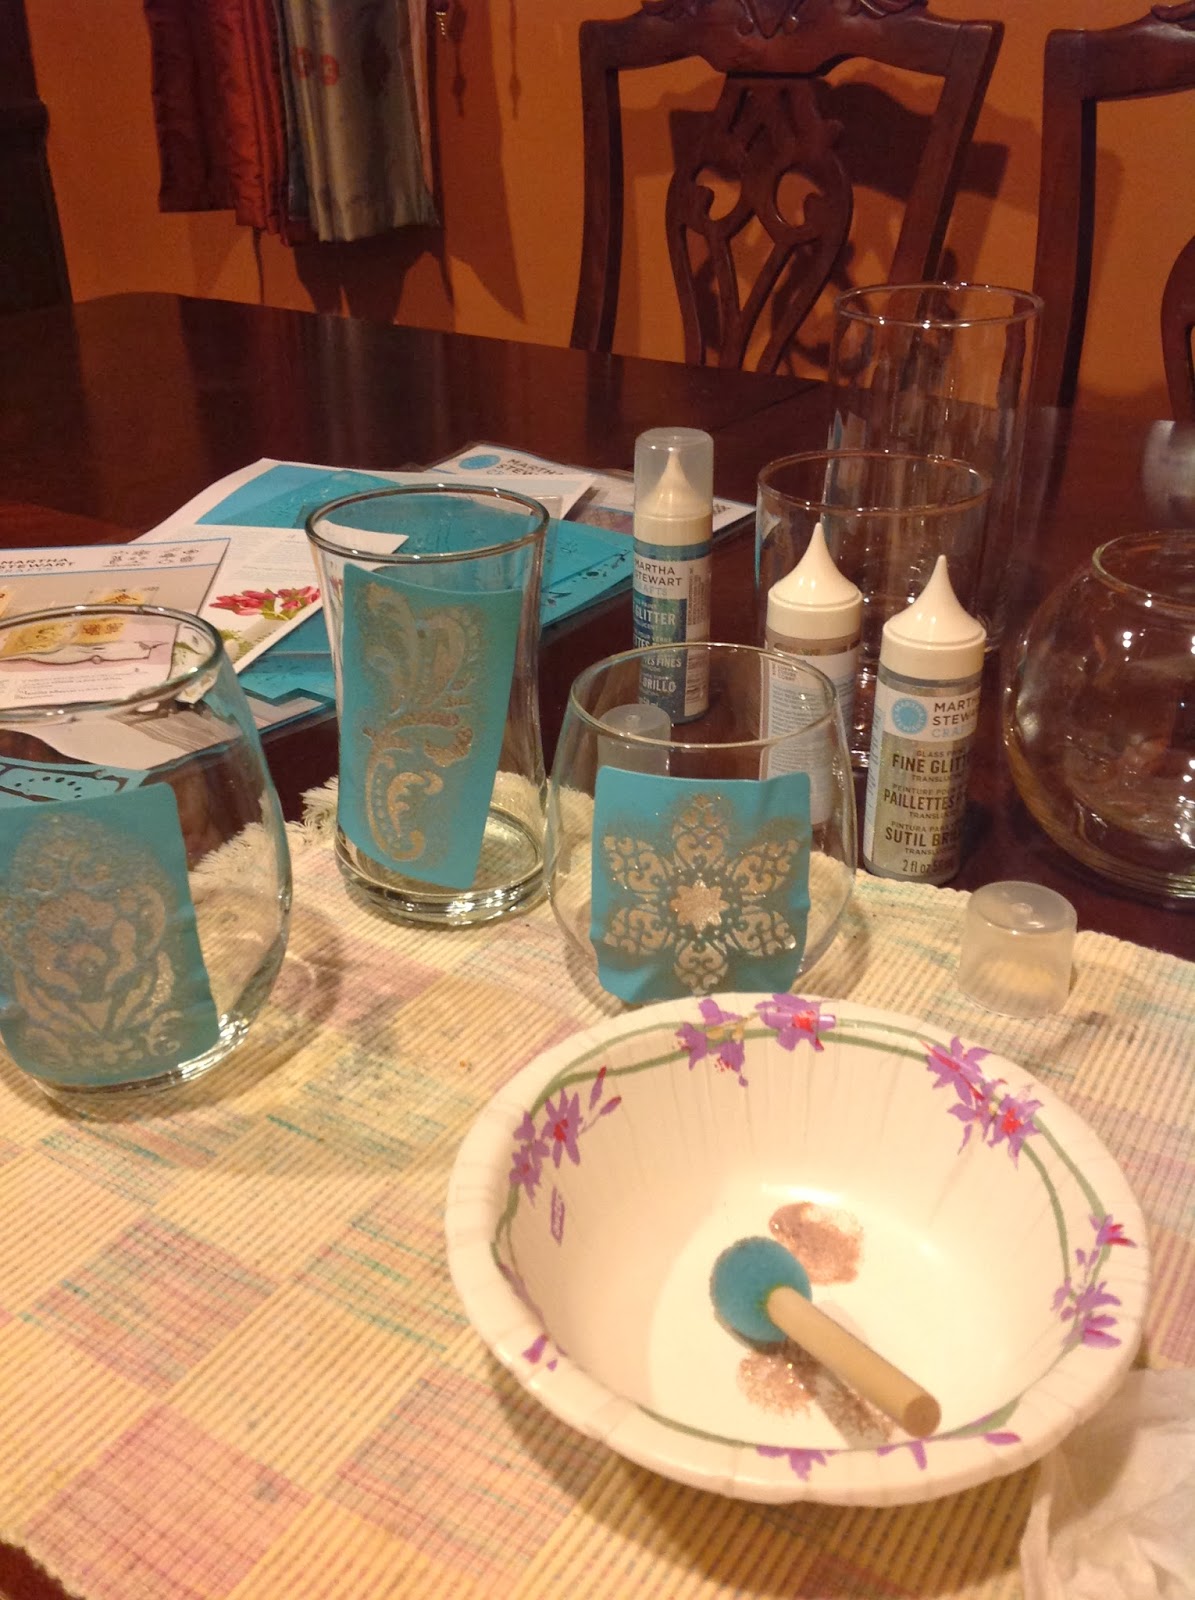
This project was inspired by the mehndi patterns that I was admiring on my hands on my plane trip home. In addition to the patterns and intricate details, I wanted to try to achieve a 3-dimensional look and texture similar to that of mehndi art. Similar 3d textured work seems to be all the rage and you can see them on all kinds of items décor items from India like candle holders, vases, frames, furniture, pottery, and etc.


Here's the step by step:


 I chose a 3D opaque glass writer paint in gloss by Americana and it worked very well. The bottle comes with a thin tip and you squeeze the bottle as you 'write' with the tip. The tip of the paint bottle should not touch the surface to be painted or written on, it smudges the 3D look. You hold it a little above the surface and let the paint drop in lines as you move along, kind of like if you were writing/detail piping a cake.


The two peacocks I outlined in pencil before I went over with the 3D paint. All the other patterns I free hand painted and filled in the details as per my taste.


After I got the patterns down, I went over with a very very thin brush and the teal paint cleaning up all the mistakes and smudges. As a final step I used an amber staining paint to get that aged look. This ageing process was important as it makes the 3D lines pop and lends some authenticity to the old art piece that I was going for.


This piece will look good in my entry way next to all the other small mirrors in that collection.


A simple mehndi done on my hands at a recent celebration


 Note: This is not a beginner project and needed a very steady hand but if you have experience piping and decorating baked goods you might find it similar. Do try painting on a scrap surface to get the feel of painting the thin lines, the control of your hand, and to see the workings of this kind of paint. 

Tuesday, November 12, 2013

Ashoka: Without Sorrow


            I believe artists, any kind of artist, struggle from time to time. Struggle with what they do creatively, with how they feel about their art, how others see it, whether it's what they want to be doing. This is partly a process as their art progresses to the next step and they become more aware of their skill and the pieces they work on, and are striving to make it better. I have learned so much over the past year about myself, my skills, and my creative interests; opening this box of learning for me, bringing in awareness of so many new concepts and ideas. 

             Of course along with this comes a very conscious and critical awareness of all these very things in my work and how lacking it is. I go through periods of immense doubt and criticism in everything I create, especially so if I am making something for someone else. It is important to find that balance between trying to put all you want and know into a piece, keeping the idea I fell in love with; but also making it skillfully sound so that others can respond to it without seeing the flaws. Back when I didn’t know so much about things relevant to my interests, the idea was important but it had to be executable within my limited skill set. But as my repertoire has expanded, the knowledge and learning available have made it possible for me to do a larger scope of work consequently bringing in more critique.

          Along with enthusiasm, motivation, excitement, ideas, a plan, and inspiration, this project Ashoka began with its share of doubt and starting troubles. I had to keep in mind the desires and requests of the owner of the piece while maintaining my signature and the integrity of my work. 

          The Mandala in this project served as a gathering center of all my energies, the process of working on this piece drawing out all my doubts and forces. In a mandala, the circle represents the dynamic consciousness of the individual, the square symbolizes the physical world bound in four directions. Just as form is crucial to a mandala so is color…white for reality, red for discernment, blue for wisdom, yellow for sameness, and green for accomplishment.

          In the end, just as the mandala’s purpose is to remove the object-subject dichotomy, the process of working on this piece brought clarity and a grasping of the essence of me and the piece in turn. In this mandala I found that my deepest intuitions were crystallized and expressed in the work in this piece, erasing all doubt and proving that the essence and concept of this piece preceded its form. I was able to successfully balance my style of work with the likes of the client.


Handmade Gifts

Diwali Luminaries

             Come festival and holiday season and I find myself combing through my favorite magazines, websites, blogs, and Pinterest for unique gifts that can be handmade. They are so much better than impersonal gift ideas or a trip to the crowded mall. I love the whole process of thinking about the person who the gift is for, planning the project, and of course executing it successfully. You end up with a pretty gift that is not only is budget-friendly and nice, but that also gave the pleasure of working on a new project. So much fun!

             For my Diwali party I put up lots of colorful string lights outside and brightened the inside of my home with pretty little lights and candles allover. I also used sandalwood scented candles in all the candle holders around my home…I love the scented woodsy warmth of sandalwood, especially during the colder months. I wanted to give my friends coming for the party a little gift to bring back to their home....from my home to theirs. I decided to make a collection of luminaries keeping with the spirit of the festival of lights.


              These luminaries were a good way of personalizing my Diwali party and at the end of the evening, my friends were able to take one home. The tiny touches of sparkle and metallics added festivity to my mantle. Though essentially they are not what I had envisioned, I am happy with these results. I also got to try out a couple of new products available by Martha Stewart. One is a translucent glass paint in fine glitter metallic colors and the other is a reusable adhesive stencil specially for applying designs to curved surfaces.


             I cannot imagine a better way of spending the holiday season than with my family, creating lovely things for my home and for the people I love and care about. So here's to spreading some crafting cheer and warmth….make something special for friends and family. And hoping you can find inspiration for handmade gift ideas at The Sandalwood Box!


Thursday, October 24, 2013

Darshanaka

Darshanaka or Darsana: that through which a glimpse, view, or vision is offered; that through which you can experience darshan; a doorway or window that gives a view or experience.
"It's a gift; it's like there's a moment in which the thing is ready to let you see it. In India, this is called darshan. Darshan means getting a view, and if the clouds blow away, as they did once for me, and you get a view of the Himalayas from the foothills, an Indian person would say, 'Ah, the Himalayas are giving you their darshan'; they're letting you have their view. This comfortable, really deep way of getting a sense of something takes time. It doesn't show itself to you right away. It isn't even necessary to know the names of things. It's more important to be aware of the 'suchness' of the thing; it's a reality. It's also a source of a certain kind of inspiration for creativity.
                                                                                                                            ---Poet Gary Snyder


              I chose to name this piece ‘Darshanaka’ as ideally this arch is like a window offering a view and, at a deeper level its inset mirror (if only I could have made that happen) is a view or reflection of one’s true nature. Additionally, referencing the quote above, this piece took its time appearing as an idea and finally granting its vision. Enlightenment can be a culmination of patient perseverance or a singular moment of clarity.
              Isn’t it sometimes that way, that suddenly when you are least expecting it, an idea will strike you knocking you on the head---and bringing to life that other idea that has been festering in the recesses of your mind for months if not years?
             That’s just what happened to me with this project. I don’t remember what I was working on at that exact time, but I do remember I was at home depot walking down the warehouse’s lumber aisles, when suddenly a light bulb went on in that dark recess of my head reviving this old project that had been put on the back burner because of execution problems. There I was, stunned for a second or so, shaking the cobwebs off this idea, blinking against the bright idea light and… pow!...all the components to make this project happen fell into place… music started playing, fireworks went off, and I had an Ah Ha! moment.
            This is how inspiration strikes me sometimes. I always find that for the first novel idea to take flight you need a second idea lighting the fire. I had an idea but it took a chance moment of inspiration to provide the framework for that idea.
           At that moment it was like a brilliant lightning strike of an idea although I didn’t know if it was executable. But the more and more I thought about it, the visual in my head got clearer, steadier, and I felt that this skeleton of an idea is exactly the solution I was searching for. I knew surely what I wanted to make and how I wanted this piece to look…And suddenly all the doubts, the problems, the motivation, the creative process, the excitement, all came rushing towards me from within that dark recess of my head…I could almost have jumped with joy!
And now I couldn’t wait to begin on the project.
            Similar arch mirrors are sold for exorbitant prices here locally and on the internet simply for their import value. Here’s the piece from my favorite store that I wanted to replicate. This one isn’t horribly expensive but still I wanted the challenge of making it myself. I wanted two of the same to flank either side of my couch. The hitch was in coming up with a diy way to make the columns and the carved work. 


            So here’s the brilliant stroke of genius (if I say so myself J), the columns are made from stair rails sawed vertically so that they can lay flat. And I had four of those shelves that you see at the base of the arch…two of those I broke apart to separate the carved front for use at the top of the arches.

And here's the project progress in pictures:
- Measured and cut out the arch in a design I liked on a good quality sheet of wood. Fine sanded the cuts to smooth them out.


- Glued the vertically split stair rails using wood glue. Used clamps while the glue set. 

- Here's the pair of them after I stained them with a dark walnut stain

-With the top panels attached

-I attached the shelf and the arch directly to the wall. I love this as is too but decided it needed a pop of color. I did not want to paint on the arch itself, so for now I have painted the inset wall red with a thin gold border. I might go back to the white wall after some time. I would have liked to have a mirror in the inset...maybe I will do that too sometime soon. 

             
              People ask me all the time if I have background education in the work I do….I have no formal training in any skill required to do any of the projects that I do, but I am good at picking up and learning skills as I go along. The interest in the creative arts has always been there, and with the resources available now, I have been able to increase my repertoire of skills. 
So, here's to hit-you-over-the-head kind of inspired moments!

Sunday, October 6, 2013

Contemporary yet Traditional Mandala


              Mandalas fascinate me. Even before I knew about the spiritual, religious, cosmic, or scientific meanings behind the Mandala, I was drawn to the beauty and symmetry in these contemplative interwoven and layered visuals.   

             The word ‘Mandala’ originating from the ancient Indian language Sanskrit loosely translated means ‘circle’. But this simple word translation fails to convey the complexity of this integrated structure that is always organized around a unifying center. It denotes wholeness. Another translation is derived from the root ‘manda’ meaning essence and ‘la’ meaning container; which gives the connotation of mandala meaning container of essence.

             We find representations of Mandalas in all aspects of our life; as literal and obvious representations, in the planet circles, or as the conceptual circle of family, friends, and community. They are also one of the world’s few elements that has transcended boundaries and is visible through all of known time, space, and cultures…in the medicine wheels and sand mandalas of the native Indian Americans, in the timekeeping device and religious expressions of the ancient circular Aztec calendar, in the Taoist yin-yang symbol representing opposition and independence, as the intricate illustrations for meditative focus in Tibetan religion, in sand paintings used in Navajo and Tibetan rituals. In architecture across Buddhist stupas, Muslim mosques, or cathedrals it has been used as the principle of design- shapes and structures built around a center or axis where all components contribute equally to the whole. Mandala includes and represents us as a part of the microcosm and macrocosm of the universe.


               I have used Mandalas in my drawings, paintings, stitchery, décor choices, and even doodling. You can see it in one of my documented projects in my blog, the end table redo ‘Mumtaz’. You will also see it in another one of my upcoming projects 'Ashoka'. In this particular project, I decided to make a contemporary yet traditional mandala. The multi-useful canvas was my goto for this even though I had never stitched on one before: the canvas is already framed and finished, perfect for this quick two-hour project, would tie-in with my 5-canvas wall art piece that you all have heard me talking about, and wasn’t going to cause me to cry if I messed up in this first attempt. I don’t know why I didn’t think of or discover the canvas in these years before; oh! The innumerable ways it can be used in!


             In terms of design choice of the mandala, I picked one that had straight lines to make it easier to stitch on a stiff canvas and one that wasn’t too traditional looking. There’s a bit of interesting math associated with this design that I have included as a footnote for all those interested.

             I used a tapestry needle and embroidery floss for this. Surprisingly, it was fairly easy to stitch on the canvas than I had imagined. For my floss color choice, I had three options: all done in one color, a color gradient of cool colors like blue, and the color gradient of warm colors like orange. Since orange is the accent color in my daughter’s room, I opted for a gradient moving from red through orange to pale yellow. Ideally in stitchery you do not knot the floss ends and simply run the ends under existing stitches. But in this case I knotted the ends to ensure tension.


                  My self-critical review would include that I wish I had used a larger canvas, I love how this turned out! (but in my defense I didn’t find a larger square canvas) and I think a black canvas would have been more dramatic (to explain my choice of a white canvas… this had to be a part of the 5-canvas piece).


Credits:
1.    This pattern was taken from ‘Islamic Patterns: An Analytical and Cosmological Approach’ by Keith Critchlow
2.    The Mandala Project


     Footnote: 
     As written in ‘Islamic Patterns: An Analytical and Cosmological Approach’ by Keith Critchlow 
     In this drawing we see a twelve-square arrangement shown as a harmonic growth pattern which can be taken as a master diagram, or archetypal proportioning diagram, used by craft schools of Islamic art down the ages, to demonstrate controlled proportional decrease or increase; in this the very smallest circular arrangement of twelve squares relates proportionally by nine stages to the largest outer group. Each set of squares is harmonically larger than its predecessor by 2. In other words, if the smallest square of any two consecutive sets has a side of 1 unit, the volume of the next square is two, using the same unit of measure. Or again, the diagonal of the smaller square, which is 2 if the edge is 1 unit, is the edge length of the next larger square in each case; hence the apparent spiral of growth, is on a harmonic progression on 2. Viewed in this way, this diagram can provide, by harmonic diminution or augmentation, a proportional guide for the design of an entire building or a single tile.

Sunday, September 22, 2013

Summer Afternoon

              Reading an interesting book laying on the grass under a big tree with a warm breeze blowing on a summer afternoon…aah! One of a favorite things. That feeling was what I was trying to capture in this project which is the second piece of the five part wall art composition in my daughter’s room. My daughter absolutely loves reading and is a voracious reader. This canvas will be perfect in her room.

              I love doing mixed media art projects. It allows more versatility and the visual peeling of the layers offers a rich experience to the viewer. It invites a person to come closer and touch with the thought “how did you make it?” ‘Summer Afternoon’ is a very basic mixed media art in which I have used a few different traditional mediums to express an emotion. 


Here's how to:
Before I begin I would like to introduce an important product used in this project: 
:Mod Podge: Mod Podge is an all-in-one glue, selaer, and finish miracle product. It is a decoupage medium available in a variety of finishes and can be used for bonding paper, wood, fabric, and other porous materials. 

Begin with a blank canvas, 3-4 pages of old books, mod podge, brushes, and writing pens. Instead of pages from books you can use magazine pages, comic strips from the newspaper, newspaper articles, black and white or sepia tone photographs, poetry pages, or any other sort of reading material. I had purchased these two books at the flea market (rest assured they are not originals).


Using any kind of wide bristled or foam brush spread mod podge generously on the canvas.


Place the selected pages of media on the mod podge. I chose complete pages but you can tear strips or random shapes or use scissors for clean edges. In my excitement I put down all the pages at the same time. I would suggest you lay the pages down one at a time slowly smoothing out the bumps and wrinkles. I tried to peel the pages and smooth out the bumps, mod podge is a miracle product so I wasn’t too worried at this point.


Make sure the pages go over the edges and sides of the canvas, it just gives it a complete finish.


Once the first layer is fairly dry, brush on more mod podge on top of the pages. Let dry completely. I know the bumps and wrinkling looks messed up but trust me...dont worry. Though I must say I was just very slightly worried that I might have ruined it. I applied pressure while brushing on the mod podge hoping to smooth them out. 


I was happy to note that the more my canvas dried out, the bumps and wrinkles seemed to disappear. Phew!
Now my canvas is ready for the next layer of my mixed media art. Using a pen (pencil doesn’t work on mod podge) I drew the outline of the girl reading. I looked up some images on the internet for ideas. 


Using black acrylic craft paint and a very fine brush I filled in the silhouette of the girl reading. Since mod podge is also a sealant, it is surprising that anything sticks to it. But as I said mod podge is a miracle product.  


I directly freehand painted the tree, its branches and leaves, and filled in its silhouette. I wanted the two title pages to be as visible as possible and so I tried to work my paintings around the words as much as I could. As a final detail I painted small free falling leaves.


Once the black paint is completely dry brush on mod podge all over including the sides and edges. Once this layer is dry brush on another final layer of modpodge. I used a satin finish mod podge for this project.


Here it is on the wall next to the birch trees cutout canvas. My 5-piece wall art is coming together. Yay!